Monday, March 24, 2014

Top Eleven Manager - Special abilities & what you need to know about them!


A lot of speculation has been going on about special abilities lately. Do they worth it this much? Bidding on players with special abilities can be catastrophic for your pool of tokens, considering you are a manager player like myself, without a fat wallet.

Lets take it step by step. Between a striker at 4 stars with "one on one" special ability and a striker at 5 stars without any, it is considered wiser to start bidding negotiations for the 5 stars player. Quality is valued over special abilities.

After this small prologue, time has come to analyze them, see what they are useful for and if they worth anything after all.
0 rating is bad, while 5 rating is perfect.


Penalty Stopper : 1 star rating
Saving the penalty does make the goalie man of the hour for sure, but is this a valuable ability ? Even if you got your eyes set on tournaments with extra time and penalty shootouts, I am afraid it is not. Any decent goalkeeper can save a penalty shot and any striker can miss target at penalty shootout.

Penalty Stopper counters Penalty Specialist


One on One Stopper : 2 stars rating
Not bad as an ability but same rule as above. Any decent goalie can humiliate a striker, even the ones with "one on one scorer" special ability. Spend your tokens and grab one if you want to, but it is considered an extravagant roster addition.

One on One Stopper counters One on One Scorer


Aerial Defender : 5 stars rating
Finally a special ability that is worth talking about. Such a defender  is able to control all aerial scenarios like indirect free kicks, corners and long passes. He may even score a few headers. A great ability for every manager that wants to create a solid defence. Stop reading this, take my advice and go grab one or more aerial defenders like right now.

Aerial Defender counters Corner specialist


Defensive Wall : 4 stars rating
This is an okay ability and comes quite handy if you have decided to go with hard tackling against your opponents. It is used to block long shots or direct free kicks.

Defensive Wall counters Free Kick Specialist and is also considered useful against Shadow Striker


Dribbler : 0 stars rating
This is probably the worst of all abilities to get. A dribbler is a midfielder or winger that dribbles. This is all and this is why he is  so undesirable by every logic manager there is out there.  Any player can pierce through enemy lines, dribbling so no thank you Nordeus, I am afraid we will have to pass on this.


Playmaker : 1 star rating
Again dont bother with it. His assists are insignificant and like dribbler, what a playmaker is credited for, is the same every common player does in game. He just passes the ball around.


Shadow Striker : 3 stars rating 
Good against any heavy fortified defense, these guys can shoot over long distance and score. Which ofcourse all your midfielders without a special ability are able to do. You get the irony, dont you?


Corner Specialist : 5 stars rating
Crossing is the spice of the game and spice must flow! These crossing specialists can deliver great corner assists for headers and in need can be assigned also as free kick takers, since they also excel at indirect free kicks. Best special attacking ability there is.


Free Kick Specialist: 4,5 stars rating
Second best special attacking ability. If you manage to buy a striker scout with it, it will better than taking penalty kicks. Why is it not at no.1 ??? because if you have another player with better crossing/shooting stats, he can be assigned to free kicks and you can save your precious tokens for another special ability.


Penalty Kick Specialist : 0 stars rating
Supposedly better accuracy for penalty kicks, that any player may score if he is lucky. Enough said, do not bother with it.


One on One Scorer : 4 stars rating
These specialists deliver, unless they do not deliver. In other words they dont always take the final shot. Instead they choose to overdo with teamplay and give a pass for another player to score. I know life gets so unfair sometimes and there is nothing you can do to make your ace striker not to pass the ball around. Despite this unpleasant fact, he is still a nice addition for every roster.


Epilogue - What to get ?
You may take nothing and still dominate every game you play, if you got a team with great quality backbone and your players have forgotten how to underperform. Thats right lads, these are just eye candies the game company threw on the table with a smart catch. You may buy scouts with 39-69 tokens, may get tokenless into bidding wars, or you may train these special abilities on your current players at the cost of lost quality, none of which worth the trouble.
You see everything comes at a price, so think twice before you go after such expensive toys. A good manager takes good care of his budget every day.

Now that everything has been explained fair and square, a few suggestions for the perfectionists.
When in the mood, get following abilities if possible: one or two aerial defenders, one defensive wall, one corner specialist, one free kick specialist and maybe a one on one scorer.

After you manage to get these specialists there will be fun times, but never forget to respect every opponent you play against and keep in your mind that managing brings success - not players and certainly not their special abilities.


Thursday, February 20, 2014

Top Eleven Manager - How to win trophies without having to spend any money for tokens!


It is an undenied fact that the more you progress every season, the higher is the demand to improve your team in order to get any title you can. This sometimes may lead to frustration about your favorite game that will lead to the following dilema: Either I have to spent money even though I dont want to, or I quit game. Well it does not have to be this or that way.


Today I am going to show you how to be a successfull manager without having to spend any money for tokens.


Lets get the facts straight right here. You can not be successfull every season without coining. A new team match up based on equal quality was implemented some seasons ago in cup, champions league and league. So no matter if your team's quality is 3***, 4****, or 6******,  you are going to play against teams with same stats next year and results may not be that nice for you since your opponents might coin. This aggressive kind of play may produce frustration so here is what you need to remember.


First of all you got to keep calm. There is no need to leave game or keep on playing to continuously advance onto the next level, because the faster you progress the harder is going to be and while at low levels it seems acceptable, at higher levels you will face a lot of guys who value their money in a different way than you do.
There is absolutely no point to spend  $$$  just to compete with them. Everyone has his own pace and they should be respected even if they spend big time. It is their money to spend after all  and you have no right to judge them.  On the other hand noone has the right to force you play in a pace you do not enjoy.

To cut a long story short, my tactic is about one year advance a level while on next  year retain same level. This is what I am going to elaborate on.


This is my trophy room. There is a lot of effort involved with it, but not a single coin spent!


For now let's forget about cup and champions league - these are only side goals, your main priority is to win the league and this is where this guide will be focused on. This way you will earn a great amount of money and get qualified into next year's champions league which will offer you the opportunity to play 6 games with extra cash per game guaranteed.


1. Season 1: You aim for place 1-4. If you cant aim this high due to better opponents, simply switch into losing every game and stay in the same league level (rank 8-14). Play current season as described in step 2 below.


2. Season 2: Go to your finances, tv rights, pick the "extra for dedication" contract there. You are expected to log in daily so you will save all your tokens and by the end of the season you will have gathered at least 35 tokens for spending next season (28 days per season give 28 tokens + 1 extra for coming back four days in a row give another 7 = in total 35 tokens).
You will let your team deliberately lose all games while you stack tokens, money (no bonus win), green & red packs.
Your players should be trained regularly, preferably with hard training which will be a daily must but do not spend your players skill points, just save them for now. Also keep you low quality academy player/s because these ones will lower some  more your team's average quality.

Example of a team that has been deliberately set up to lose. Players out of position to underperform. Goalkeeper out of position to make opponent's ball possession go 80%. Focus passing through the middle while players stay on both sides just to make sure team gets defeated.


3. Season 3: You wait 3 days to be matched up with rivals at your current quality, so on day 3 when league starts you will have extra money, extra green & red packs but most important of all, you will have the whooping amount of 450+ skill points to spend and get this way a great headstart over your opponents.
After the third season day begins, you can sell your academy players. You will also want to strengthen your roster but shop wisely.
Always check other bids on that player you like to offer tokens before you do so. Check other bidder info, if you see a roster full of 6 star players, or an outrageous money budget for your standards, just forget about it. Try to get the best out of your current squad and try again for the player you need tomorrow.
After the initial tokens madness rush in the first days of the season, you may be able to cash in better value for your tokens/money. It is all about showing patience after all.


So this is it.  Rinse and repeat those 3 simple steps and you will  be a successful manager without coins involved.


Sunday, February 16, 2014

Top Eleven Manager - Counter Formations & Orders Brakedown - How to set up your team for the Win!


*** UPDATED EDITION ***


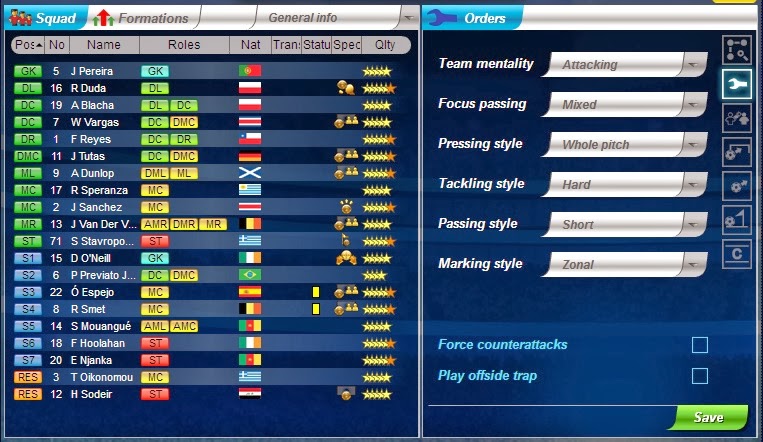
Before you choose your ideal counter formation, you need to compare both teams quality in order to decide about your team's orders. 


Team Mentality
If you are better 1 star or more quality, choose attacking mentality. If your opponent is better choose defensive mentality.
Focus Passing
If your formation has wingers focus passing should be set on down both flanks. If your formation has AMC focus passing should be set on through the middle. 
Pressing Style
Own half will do for 95% of your games. Whole pitch is only suggested when your opponent is really weak and you need to dominate the match.
Tackling Style
Normal for any team with a small roster to avoid injuries/cards. Hard for every team with a full roster that can take the suffering throughout whole season. Dont even try easy option.
Passing Style
Short will provide passes only if your lines are close to each other.(for example AML+AMR between middlefielders and strikers). If you are not sure about it, it is recommended to go with mixed. Long blends well with defensive mentality and counter attacks checked.
On a side note: short passing will boost your passes completed % ingame stat, while long passing will make your attacks occur faster.
Marking Style
Always play zonal because this way your players cover each other.

  • Force Counterattacks: Only with defensive mentality and long passes as mentioned above.
  • Play offside trap: Only if you have compared both teams speed and you are faster. Three defenders perform offside trap much better than four.


The following are only suggestions, they are not game changers.

Let's not forget there is a thing called RNG (Random Number Generator) and sometimes can mess things up pretty bad, no matter how awesome you are as a Football Manager. 


Opponent's Formation

5-4-1
5-3N-2
5-3W-2
5-1-3N-1
5-1-3W-1
5-1-2-1-1 Narrow Diamond
5-1-2-1-1 Wide Diamond
5-2-(2AML/AMR)-1
5-2(ML/MR)-2(AMC)-1
5-2-2(AMC)-1
5-2-1-2 X-Style
5-1-1-1-2
4-5-1 Flat
4-5-1 V-Style
4-4-2
4-1(DMC)-2-3
4-1-2-1-2 Narrow Diamond
4-1-2-1-2 Wide Diamond
4-1-2-2(AMC)-1 Loop
4-1-1-2W-2
4-1-1-2N-2
4-2(DMC)-1-2(AMC)-1
4-2(DMC)-1-2(AML/AMR)-1
4-3W-3
4-3N-3
4-1-3N-2
4-1-3N-1-1
4-1-3W-2
4-1-3W-1-1
4-2(DMC)-3W-1
4-2-3N(AMC)-1
4-2-3W(AMC)-1
4-3N-1-2
4-3W-1-2
4-3W-2(AMC)-1 Xmas Tree
4-3N-2(AMC)-1
4-3N-2W-1
4-2-2-2 Hexagon
4-1(DMC)-2(MC)-3
4-1-2(AMC)-3
4-2-1-3
4-1-4-1
4-4-1-1
3N-5-2 Flat
3W-5-2 Flat
3N-5-1-1
3W-5-1-1
3W-4-3
3N-4-3
3W-1-4-2
3W-1-4-1-1
3N-1-4-2
3N-5-2 V-Style
3W-5-2 V-Style
3W-2(DMC)-3W-2
3N-2-3W(AML/AMC/AMR)-2
3W-2-3W(AML/AMC/AMR)-2
3N-3-2W(AML/AMR)-2
3W-2-3W-1-1 Maple Leaf
3W-2(DMC)-2W-1-2
3W-2N-2N-2W-1
3N-2N-1-2W-2
3N-1-2-1-3
3W-1-5-1
3W-1-3W-2(AMC)-1
3N-1-3W-2(AMC)-1
3W-1-3W-1-2
3N-1-3W-1-2 Dandelion
3N-1-4-1-1
3W-1-3N-1-2
3N-4-1-2
3W-4-1-2
3N-2(DML/DMR)-3N-2
3N-2(DML/DMR)-2-1-2
3-2-2-2-1 Butterfly
Counter Formation

4-4-2 OR 3-5-2 Flat
3N-4-1-2 OR 4-4-2
3N-4-1-2 OR 4-4-2
3N-5-2 V-Style
3N-5-2 V-Style
3N-5-2 V-Style
3N-5-2 V-Style
4-4-2
4-2-2-2 Hexagon
3N-1-3W-1-2 OR 3N-1(DMC)-3W-3
3N-1-4-2
4-3-3 OR 4-2-2-2 Hexagon
3-5-2 Flat OR 3-5-2 V-Style
3N-2(DML/DMR)-3N-2 OR 4-3N-3
3N-4-1-2 OR 4-3W-1-2 OR 3-2-2-2-1 Butterfly
4-1-4-1
4-5-1 V-Style OR 3N-5-2 V-Style
3-5-2 Flat
4-2(DMC)-2-2 Hexagon
3N-3(DML/DMC/DMR)-2-2 OR 3N-2N-1-2W-2
4-5-1 V-Style
3N-1-4-1-1
5-2-2(AML/AMR)-1 OR 4-4-2
4-4-2  OR 4-5-1 V-Style
4-1-4-1
4-3N-2(AML/AMR)-1
3N-5-2 V-Style
4-5-1 V-Style OR 4-4-2
5-1(DMC)-2-2
3-2-2-2-1 Butterfly
3W-2(DMC)-3W-1-1 OR 3W-2(DMC)-3W-2 OR 4-4-2
4-4-2
4-3N-2(AML/AMR)-1 OR 4-5-1 V-Style
4-1-4-1 OR 3N-1-4-2
3W-2(DMC)-3N-1-1 Eiffel Tower OR 4-5-1 Flat
3W-2(DMC)-3W-1-1 Maple Leaf
4-4-1-1
3N-4-1-2 OR 4-5-1 V-Style OR 3-4-3
4-1-4-1
5-1-3W-1
4-5-1 V-Style OR 4-3N-2W-1
4-2-2-2 Hexagon OR 3W-4-3
3-5-2 Flat OR 4-5-1 V-Style
3-2-2-2-1 Butterfly OR 4-3-2(AML/AMR)-1
4-5-1 V-Style
4-1-2-1-2 Narrow Diamond
4-2-2-2 Hexagon
4-3N-2(AML/AMR)-1 OR 4-4-2 OR 3-5-2
4-1-2-1-2 Narrow Diamond
4-5-1 V-Style
4-5-1 V-Style
4-3N-2(AML/AMR)-1 OR 4-2-2-2 Hexagon
3-2-2-2-1 Butterfly
3W-5-2 flat
3-2-2-2-1 Butterfly OR 4-1-2-1-2 Narrow Diamond OR 4-4-2
4-4-2 OR 4-3-3
4-3N-2(AML/AMR)-1
4-5-1 V-Style OR 3N-1-4-2
3W-5-2 V-Style
4-4-2
3-2-2-2-1 Butterfly
4-1-3N-2 OR 4-5-1 V-Style
4-3N-2W-1
4-5-1 V-Style
4-5-1 V-Style
3-2(DMC)-3-1-1 Eiffel Tower OR 3N-5-2 Flat
4-5-1 V-Style OR 4-4-2 OR 4-1-2-1-2 Wide Diamond
4-1-2-1-2 Narrow Diamond
4-5-1 V-Style
4-1-2-1-2 Narrow Diamond
4-5-1 FLAT OR 4-1-2-1-2 Narrow Diamond OR 3-5-2 FLAT
4-1-2-1-2 Narrow Diamond
4-2-2-2 OR 4-3N-2(AML/AMR)-1


  • "W" = Wide
  • "N" = Narrow
  • "V-Style", "Narrow Diamond", "Wide Diamond" etc. = How the formation looks on the field.


Use at your own risk. If you have to choose one formation out of two or more, pick the one your players are better than your opponent's and on good shape at that given time.